
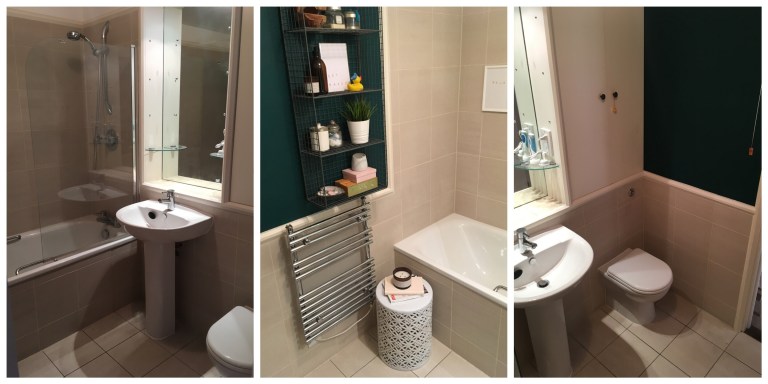
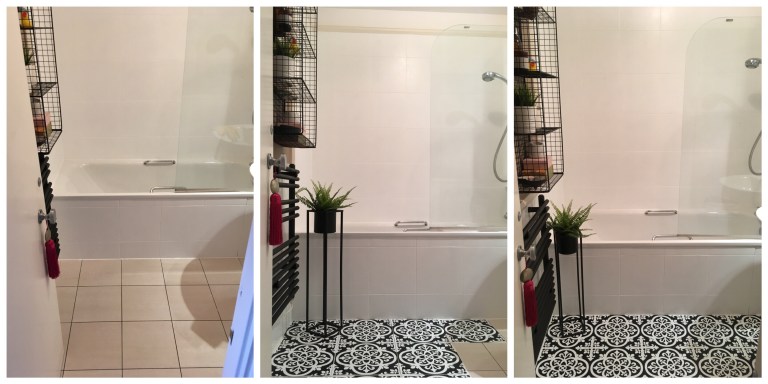
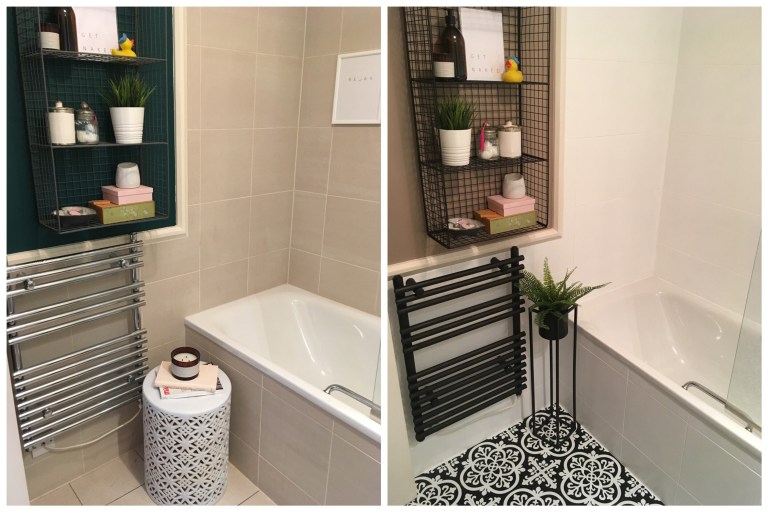
Okay, I’m sure many people won’t be too offended by the ‘before’ shots – it is all relatively innocuous, but just not my style at all. I certainly would never have picked that many beige tiles, but as nothing in the room was broken or damaged it would have been exceptionally decadent and wasteful of me to rip it all out and start again, however much I was tempted!! That meant I had to work with what I had, and I set myself a £250 budget to cover the changes, which I split into three stages – radiator, tiles and floor.
Stage 1
Do the messiest job first
Paint the radiator
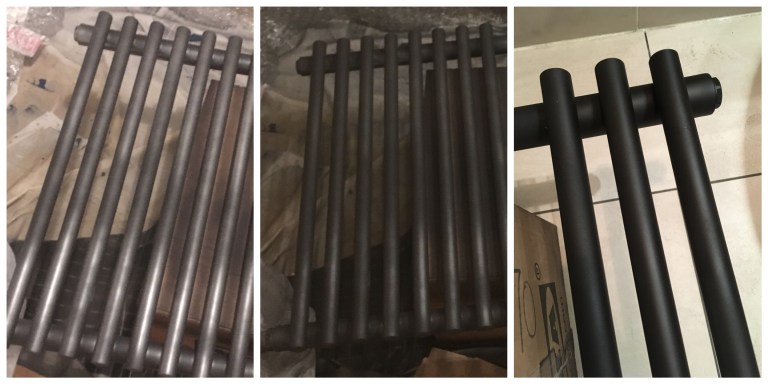
In this case that was always going to be the radiator. Not only is it full of water, but it’s plugged into electrics situated deep in the wall, behind the tiles, so there was no way I would have considered taking all that apart – it was clearly going to have to be sprayed in situ.
You will need
- Dust protectors / plastic sheeting. Cover EVERYWHERE because spray residue gets into every nook and cranny – don’t worry too much about walls, as gravity will ensure that 99% of it lands on the floor, but be sure to cover any flat areas like the bath lip, toilet seat and open shelving
- Dust mask. Unless you have a very palatial bathroom (lucky you) then it’s likely you’re going to be stuck in a small space with a lot of paint residue in the air. Make sure you have a suitable mask to protect yourself from the fumes and paint residue. If you have a bathroom extractor fan, keep that on while you’re working, and leave on for at least an hour after you have finished
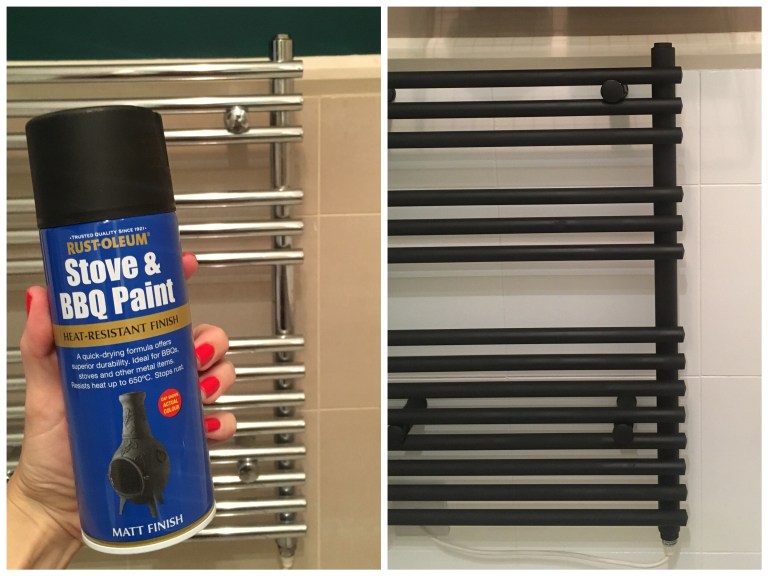
- A spray paint suitable for covering metals, is rust proof and heat-and-water-resistant. I used Rust-Oleum’s Stove & BBQ Paint in black matt finish. They do sell a range of radiator-specific paints, but the range does not have matt black, so I figured that this was the perfect alternative given it is suitable for temperatures up to 650°C!
- I also found it useful to have a strong box to rest the radiator on/against while painting. This keeps it away from the walls and will stop you tripping over it while you’re waiting for the paint to dry. Bear in mind that it can’t go back on the wall until the tiles behind have been painted, so it’s going to spend a lot of time under your feet and in the way!
How To : Paint The Radiator
- Clean the radiator to within an inch of its life! Make sure there is NO residue or dust on it AT ALL. If there is, your paint won’t properly adhere and you won’t get that professional finish
- Spray from about 6 inches away, building a light first coat. Once this is dry to the touch (give it about 30 mins to be sure) you can apply the next coat
- I did four coats in total – three would have done the job, but I decided on a fourth to ensure it was perfect
- Don’t forget to also spray the attachment pieces that secure it to the wall! Mine were easy to remove in their entirety (and only needed two coats) but if yours are permanent wall fittings then you’ll have to cover the tiles behind and spray them where they are
Top Tips
- Don’t be dis-heartened by the first coat. It will look awful, and you will think ‘what the hell was I thinking?!’ and start regretting your decision. Push past this, because it will get better and better with every layer you spray on
- For me, one paint can did three coats – I cracked open a second can for the fourth coat, but it wasn’t totally necessary
- Don’t be scared by the mess! The spray will leave a fine powder coat all over the place, so if you’ve not been diligent enough in covering everything up don’t worry, as it will all clean off with soapy water
Waiting for paint to dry?
Keep yourself occupied with other jobs!
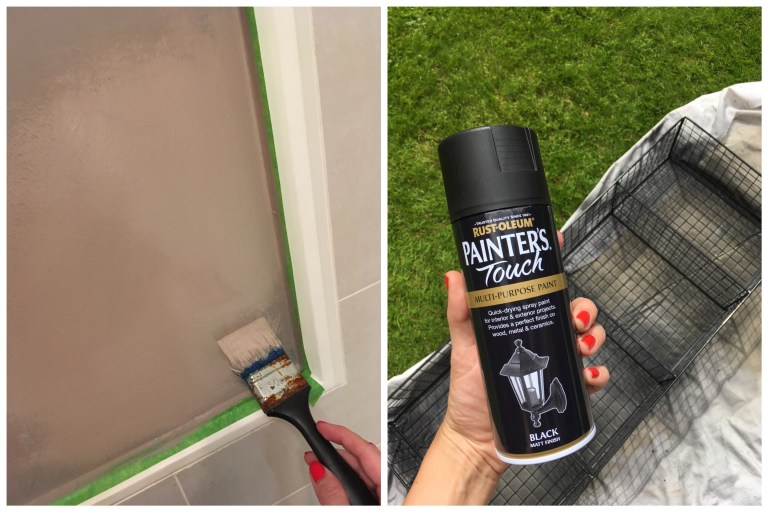
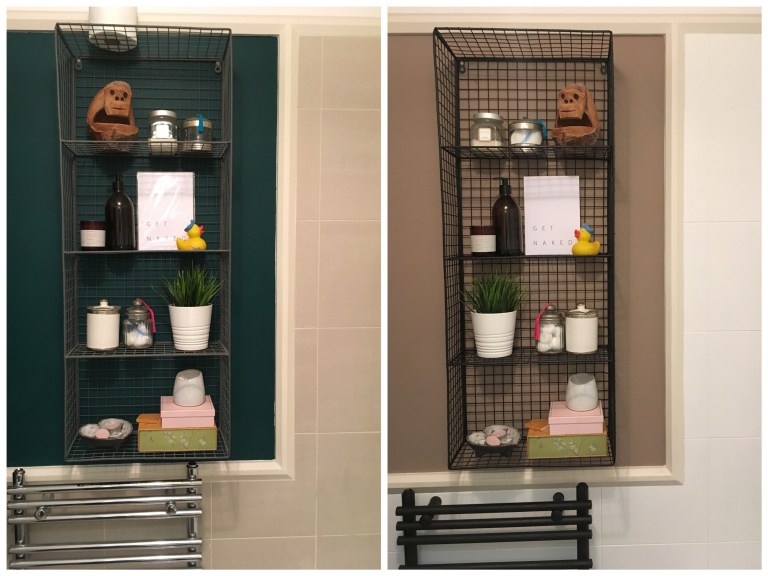
In between spraying each coat of the radiator I masked off and painted the small sections of wall that weren’t covered in tile, and spray painted a wire wall unit outdoors. It’s always best to keep active by doing easy jobs in the down-time as it’ll make the time fly by, and you’ll be grateful not to have to do these things later on in the process.
Stage 2
The big job : Painting the tiles
Before starting this, you need to make sure those tiles are very very clean. I just used soap and water to start with, but finished off by going over every tile and the surrounding grout with the scouring pads that came in the paint kit. I just used water for this, but I was careful to examine each tile and get rid of every spot of soap scum (pay special attention to the tap areas and bath sill) as the paint will not stick to this.
You will need
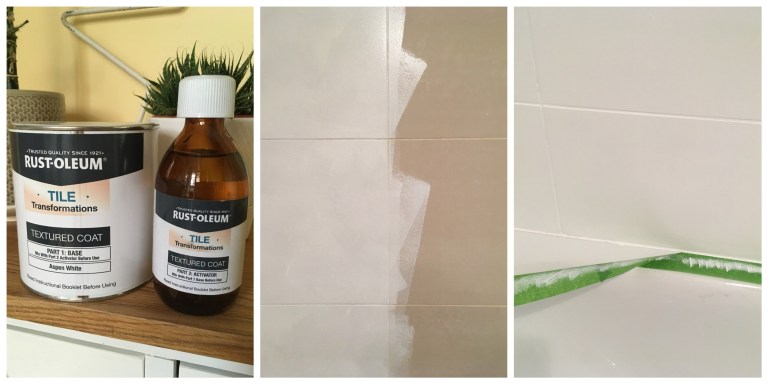
- A paint suitable for use on ceramic/tiles. I used Rust-Oleum’s Tile Transformations kit in Aspen White
- Plastic containers (I used an old food pot) for mixing small batches of the paint
- Disposable mini rollers, paint tray and sponge brushes – the Rust-Oleum kit comes with a roller head but you will definitely need extras (especially if you follow my tip below about splitting up the paint)
- A damp cloth. Although the paint is oil-based having a wet cloth on hand to immediately wipe up any spills is essential
- Masking tape. My preferred brand is “>Frogtape, as it has never let me down so far. For this job I went for the slightly thicker 36mm roll as there is always the risk of being over-zealous with a roller and accidentally painting over the tape boundary
- Rubber gloves. You will be thankful for these, I promise. I did the first coat without them, and got absolutely covered in paint – because it’s oil based it was a bloody nightmare to remove, and I spent a good hour cursing my stupidity in thinking I didn’t need the gloves!

How To : Paint The Tiles
- Work around every edge with Frogtape, spending extra time making sure it is firmly secured around the awkward-shaped areas like the shower controls and toilet flush
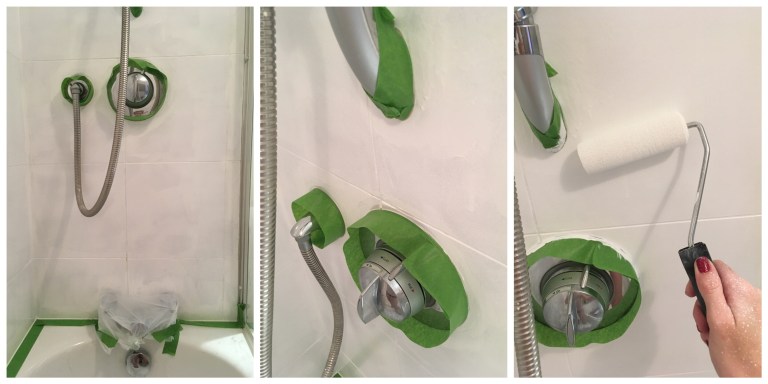
- The paint kit consists of two parts – a white base in a tin, and a clear activator in a glass bottle. Once you mix these together you have 90 minutes to work with the paint before it starts to harden, so you have to cover ground quickly and efficiently. I decided to only mix up half of the paint at a time; this way there was no excess left to harden
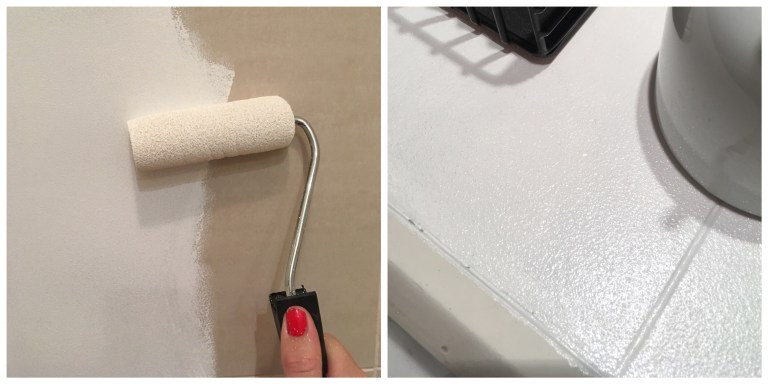
- Using the foam roller I painted as much of the wall as I could with half the mix, and then waited the recommended 10 hours before mixing up the rest and doing the next coat. This is obviously going to be a slower method, but you won’t waste paint, and you’ll get a better finish by not rushing the job
- I removed the Frogtape after half an hour. This seemed enough time for the paint to no longer be sticky and wet, but not so long that it had hardened completely
Top Tips
- The paint kit comes with a microfibre roller head (for an ultra smooth finish) but I decided to use foam heads instead, as they give a slightly textured finish, that I preferred, and consider to be more hardwearing
- I would say that if you are painting over shiny tiles, use the roller from the kit, as this will give the smoothest finish, matching the tiles beneath
- To paint the tighter corner areas I used small foam brushes. I bought a cheap pack of these on Amazon and disposed of them once they lost their stiffness. The handles are wooden so be sure to recycle!

- I was a little slapdash where the wall met the floor, as I knew I would be covering it up afterwards, but if you’re not doing this you might want to run a wet cloth around the edges once you’ve taken up the Frogtape, to ensure all the excess is removed before it starts to harden
- Make sure you cover up that radiator that’s resting on the floor – you don’t want all your hard work to be spoilt by white paint spatters do you!
Clean & tidy
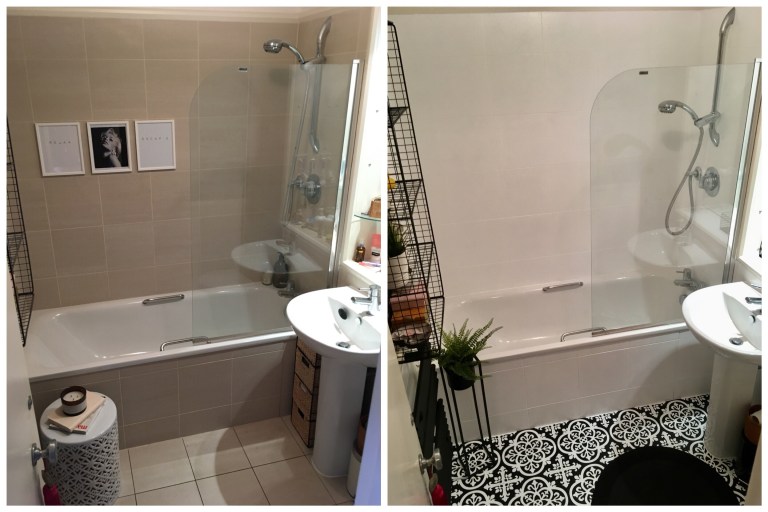
Now the tiles are dry, you can hang the radiator back on the wall. This is a fairly easy job, but depending on how big your rad is you may want another pair of hands to take the weight while you secure it in place. You’ll be very pleased to get the floor space back – my bathroom is small and it was a right pain having to cautiously step around it to paint the tiles.
With the rad back in place, I spent about an hour cleaning up the mess I had made in painting the tiles. I used a Stanley knife to scratch paint splodges and spatters from the bath and basin (I got bored painting and did get a little careless) and I gave the floor a very good clean using soap and water.
Stage 3
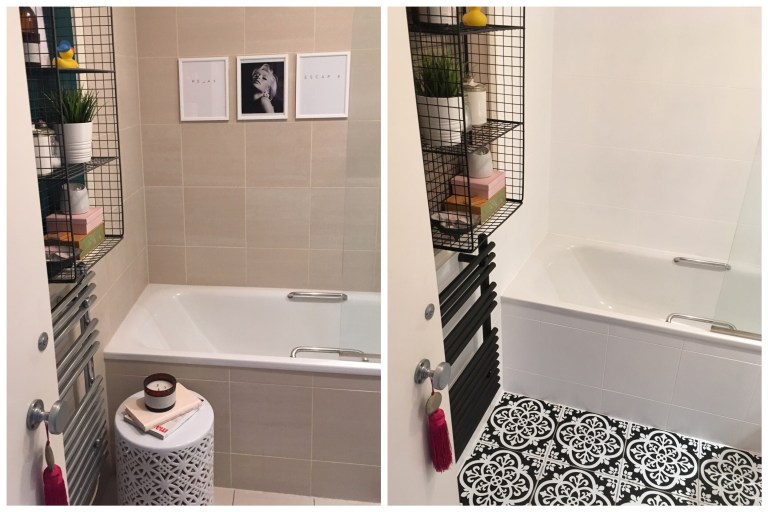
The showstopper : The floor
This is the last piece of the puzzle, and you will now start to see the room really come together.
You will need
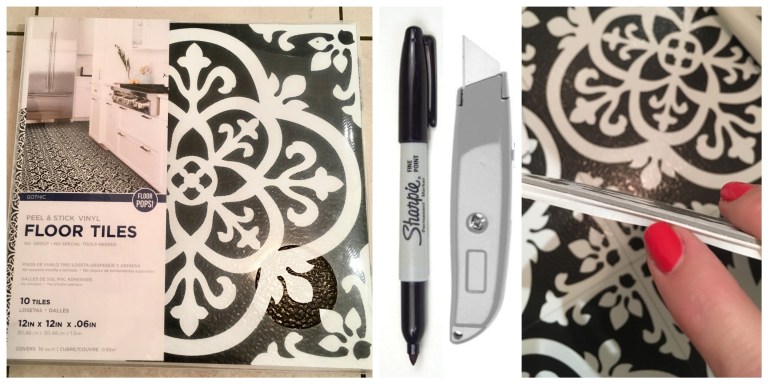
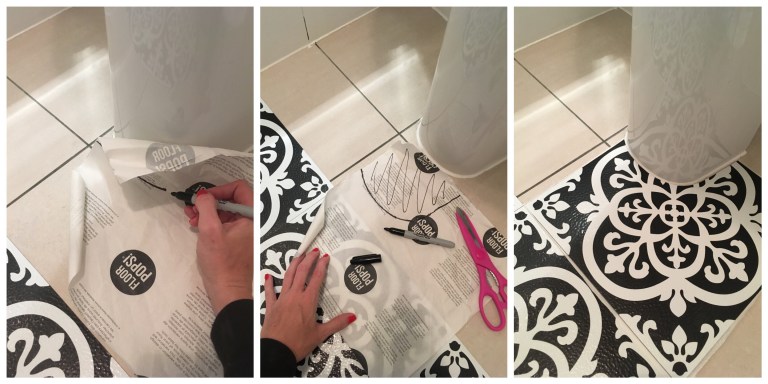
- Packs of floor tile stickers. I used ‘Gothic Peel and Stick’ vinyl tiles from WallPops! I would suggest over-ordering by about 3 stickers, as you are bound to make at least one mistake when cutting them
- A permanent marker pen to mark up your tile templates
- Scissors to cut your templates
- A sharp craft knife to cut the tiles to shape
How To : Use Floor Stickers
- Check the floor is clean. If necessary, give it another scrub to get as much dirt and soap off the tiles as possible
- Next up, you need to decide on the pattern you are going to lay. Do this by placing your tiles on the floor and moving them about until you find a layout that you like. This will differ depending on the size of your room and where your sink and toilet are situated, so I won’t even offer advice on this, just go with your instincts!
- I would say that the pattern of your tile may dictate your decision – mine are quite ‘busy’ so it is unlikely to be obvious if they were not laid completely symmetrically, but if you are using a plain design you may find the opposite is true
- You might just want to stick to the layout of your current tiles (and this is likely to be the best method) but I did not match the existing tile placement for two reasons – 1. The tile stickers were slightly larger than the existing tiles and 2. Whoever lay the originals did not measure correctly, and they did not match up to the grout lines of those on the walls or side of the bath. I always felt they were in the wrong place anyway, so this was an opportunity to correct that
- The process is literally as simple as peel-and-stick! Once you’ve set the tile down, press firmly and hold for 30 seconds to ensure maximum adhesive contact to the floor
- Of course the great thing about using stickers is that if you make a mistake you can just peel the tile up and re-position or re-cut to fit the space. SO easy!
Top Tips
- Keep hold of the backings that you peel off – these are perfect to make templates for cutting out the trickier shapes around the doorway, basin, toilet and any pipework you may have
Finishing touches
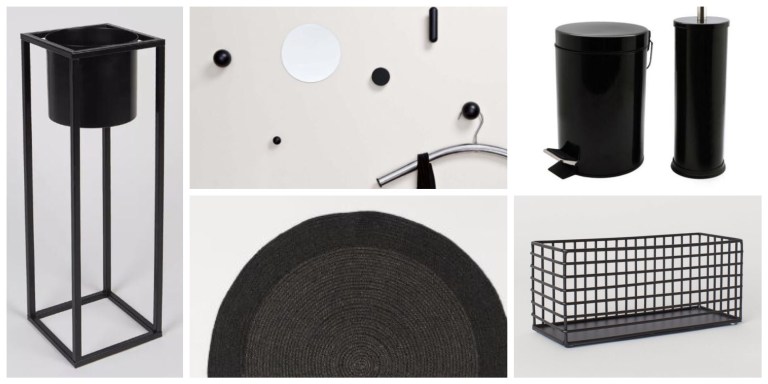
Once you’ve done a makeover like this you’ll find that you suddenly have a new-found interest in keeping the room spotlessly clean and tidy! I certainly did anyway. For that reason I had a good clear-out of the cupboards and shelves, and re-homed a lot of things that had previously just been left lying about on surfaces. I also wanted to get some new items that better matched my new monochrome scheme:
- Tall metal planter / Matalan / £16
- Assorted black wall hooks / PrettyPegs / Varying prices
- Round jute bath mat / H&M Home / £17.99
- Small black bin and toilet brush set / Rinkit / £9
- Wire storage basket / H&M Home / £9.99
Admire your hard work!
For me, looking at before/after shots makes all the effort and exertion worthwhile. The biggest difference to the room has to be how light it is now – having the tiles white has made it so much brighter and fresher.
Budget Breakdown
For those interested in how the budget worked out, here are the finer details:
- Wall paint / Weathered Trellis / Valspar / £16
- Tile painting kit* / Tile Transformations / Rust-Oleum / £49.99 x2
- All-purpose spray paint* / Black Matt / Rust-Oleum / £9
- Heat-resistant spray paint* / Stove & BBQ / Rust-Oleum / £9
- Floor stickers / WallPops! / £14.99 x3
- Metal planter / Matalan / £16
- Artificial fern / IKEA / £8
- Black wire storage basket / H&M Home / £9.99
- Small black bin and toilet brush set / Rinkit / £9 (discount code)
- Black hooks* x3 / PrettyPegs / £20
Total Spend = £241.94
*Items very kindly #gifted by the brands

Hi Sophie, I just discovered your blog via mydomaine.com, and I am so happy I found it! So inspirational, thank you!
This bathroom makeover is absolutely stunning. It might be the best I have seen so far.
May I ask: Are you renting? Is that why you did not replace the fittings with black ones, or was there another thought behind it, like maintanance, harder to keep clean, etc.?
Just curious, because I am going to buy an apartment for the first time soon, and I would like to minimize the mistakes when I renovate 😀
Best!
Esther
Also…. how are the stick n’ peel tiles holding up?
They’re amazing! I honestly can’t recommend them enough, it’s been five years now and they are as good as the day I put them down!
Hi Esther, it’s my own flat, so I do have control over changing fixtures and fittings, but tbh when I moved in the bathrooms were pretty new and I just felt that it would have been financially and environmentally wasteful to replace things that were perfectly functional. In future I will probably switch out the taps to be black, but the painted radiator is still in superb condition; it hasn’t got a single chip of paint after 5 years!